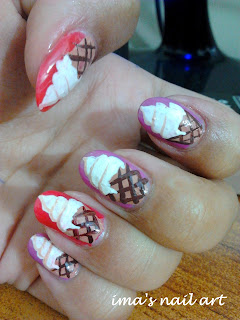
Ice Cream Nail art tutorial
hey guys... I'm back again :D
this time with an ice cream nail art tutorial :D
THINGS I'VE USED
1. a base coat (colour studio professionals)
2. purple nail polish (local brand)
3. reddish pink shade of nail polish (local brand)
4. mocha by colour studio professionals
5. white acrylic colour
6. yellow, blue and red acrylic colours to make the brown colour of ice cream cone. (as demonstrated in the picture below)
 you can adjust the shade to a lighter tone by adding white acrylic.
7. a top coat
HOW TO DO IT:
STEP 1:
Apply a base coat to protect your nails.
STEP 2:
Apply any base colour that you like :D I've used a purple and a reddish pink shade. To make the design a little different, I painted my ring and thumb finger the reddish pink colour and the rest of them with the purple. You can paint them all with the same colour or each with a different one or try it my way :)
STEP 3
Now, the big thing girls :D You got to make the ice cream cone. :D
Now since I practised it a few times...I came across a few mistakes that made my ice cream look a little less attractive. one is that the cone should be prominent ....take the cone half way up to your nail and then the ice cream would occupy the rest of the half. second one is the shape of the cone..you mind need to practise a bit..but just a bit, trust me ;)
The picture shows the steps to make the ice cream cone. If you come across any problem feel free to write :))
I've used my striper for the lines of the cone and the curves of the ice cream. I chose mocha by colour studio professionals for the curves of the ice cream
STEP 4
Apply a top coat to seal your design ;)
You might like to add some wafers in the ice cream, or make ice cream on one nail and make small white polka dots on the rest of your nails :))
Hope the tutorial was helpful :) For any queries feel free to comment below or write on my Facebook page :))
this time with an ice cream nail art tutorial :D
THINGS I'VE USED
1. a base coat (colour studio professionals)
2. purple nail polish (local brand)
3. reddish pink shade of nail polish (local brand)
4. mocha by colour studio professionals
5. white acrylic colour
6. yellow, blue and red acrylic colours to make the brown colour of ice cream cone. (as demonstrated in the picture below)
 you can adjust the shade to a lighter tone by adding white acrylic.
7. a top coat
HOW TO DO IT:
STEP 1:
Apply a base coat to protect your nails.
STEP 2:
Apply any base colour that you like :D I've used a purple and a reddish pink shade. To make the design a little different, I painted my ring and thumb finger the reddish pink colour and the rest of them with the purple. You can paint them all with the same colour or each with a different one or try it my way :)
STEP 3
Now, the big thing girls :D You got to make the ice cream cone. :D
Now since I practised it a few times...I came across a few mistakes that made my ice cream look a little less attractive. one is that the cone should be prominent ....take the cone half way up to your nail and then the ice cream would occupy the rest of the half. second one is the shape of the cone..you mind need to practise a bit..but just a bit, trust me ;)
The picture shows the steps to make the ice cream cone. If you come across any problem feel free to write :))
I've used my striper for the lines of the cone and the curves of the ice cream. I chose mocha by colour studio professionals for the curves of the ice cream
STEP 4
Apply a top coat to seal your design ;)
You might like to add some wafers in the ice cream, or make ice cream on one nail and make small white polka dots on the rest of your nails :))
Hope the tutorial was helpful :) For any queries feel free to comment below or write on my Facebook page :))


this prolly was amongst the top three uve dne so far... superb :)
ReplyDeletethankyou sooo much :) your comments matter allot :)
ReplyDelete