Posts

Showing posts with the label nail art designs

TUTORIAL: Nail art with nail art pens
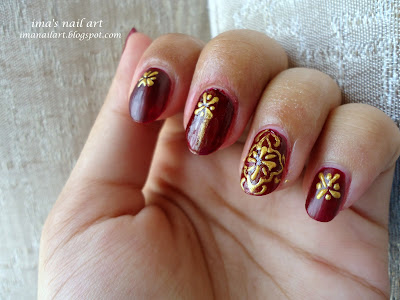
Image
Hey guys, Here is a new nail art :D My sister gifted me a nail art pen a couple of days back, and i was thinking of doing something creative with it. This is what I came up with. THINGS YOU NEED: A maroon nail color A golden nail art pen A base coat A top coat HOW TO DO IT: Apply a base coat to protect your nails and let it dry. Now apply the maroon nail color on your nails and let it dry. Next take the nail art pen and start making the design on your nails as shown in the picture below. It is better to practice on a paper before you do it on your nail. Apply a top coat. Your easy nail art is ready :D I hope you guys like the nail art and find it easy. For any queries you can contact me on my facebook page or post your problems in the comments below. See you guys next time.

TUTORIAL: Monarach butterfly nail art

Image
Hey girls ..:)) Hope you guys are doing great...:)) This time I'm doing a monarch butterfly nail art tutorial. It might seem a little difficult, but trust me its not and you can easily do it..:)) Do give it a try and don't forget to send me the pictures of your monarch butterflies on Facebook. (https://www.facebook.com/imanailart) THINGS YOU'LL NEED :  Any base color of your choice.  A black nail color or acrylic color. I used acrylic color. A thin brush White nail polish A dotting tool (you can also use your brush) Base coat Top coat HOW TO DO IT: STEP 1: Apply a base coat to protect your nails. STEP 2: Apply the base color of your choice. I have used baby blue by colorstudio professionals STEP 3: Make the butterfly as illustrated in the picture above. STEP 4: Use white polish and a dotting tool or brush to make the white dots. STEP 5: Apply a top coat to give your butterfly a final look ;) Hope you guys like it and find it ...

Tutorial: Bow nail art

Image
hey girls :D this time i'm back with a bow nail art tutorial...a friend over facebook asked me to show how to do a bow nail art, so i made my own version of the nail art ;) Hope you like it :)) lets start now ;) THINGS YOU NEED: A light pinkish shade, i used cosmo by colorstudio professionals. (optional) A white nail polish A red nail polish A dotting tool A very thin brush A top coat A base coat.   HOW TO DO IT: STEP 1: Apply a base coat to nourish and protect your nails form discoloration. STEP 2: Apply a pinkish white nail color as a base color. This is optional. You can jump to the next step with the natural color of your nails too ;) STEP 3: Now, do a manicure on your nails, alternating with red and white nail polish. You do not need to do a very neat manicure as you can see mine because neat manicures take a little effort and time. Besides we still have to outline the manicure which will conceal all the flaws ;) STEP 4: Line the manicure o...

Tutorial: Breaking dawn nails

Image
hey girls..I'm back with the hot breaking dawn nails..:D All of us have been impatiently waiting for breaking dawn to realease, and here we are, it's about be released girls :D and I'm sure you guys will love to wear the breaking dawn nails while watching the most anticipated part of the saga :D So lets not waste time and start :D THINGS I USED: a black polish a white polish or white acrylic paint would make it rather easier to make the piece. a matte top coat a thin brush. a grey polish a top coat a base coat. TUTORIAL: STEP 1: Apply a base coat to protect your nails. STEP 2: Apply a black nail colour to your nails. STEP 3: Now, we have to make the piece. For this you need a very thin brush and a white acrylic colour or nail polish. Now start making it as shown in the picture tutorial below. It's very easy, trust me, i made it in the first go ;) STEP 3: Now make the checkerboard design. It's absolutely up to you if you want ...

Tutorial: how to make a lined nail art

Image
hey guys :) its a request post...hope u like it :) some of you might find the nail art a bit difficult because the lines are not that easy to make plus you need to a very very thin striper brush for this. however, i'm sure with a few tries you'l get perfect :) even for me, this was my first try at this ;) THINGS YOU NEED : A base colour a base coat a striper brush(very thin) a black nail colour a top coat for those of you who do not have a striper brush, like me, make it yourself ;) take a simple painting brush or maybe an eyeliner brush, and shape according to your need :) HOW TO DO IT: STEP 1: Apply a base coat to protect your nails. STEP 2: apply the base polish, any colour of your choice and let it dry. STEP 3: Take some black polish or acrylic colour to make the stripes. Be a little carefull with your hand and keep it steady while drawing the stripes. STEP 4: Apply the top coat.

Tutorial: Popcorn nail art tutorial

Image
 hey guyz...:) there has been a little longer gap between the posts this time...i apologize...i have been busy with my admission issues..anyways here i am with the popcorn nails :) so lets start :D THINGS I HAVE USED: a base coat a white nail colour a red nail colour a striper an orange and white acrylic colour to make the popcorns a top coat HOW TO DO IT: STEP 1: Apply a base coat. STEP 2: Tape all your nails diagonally except for the ring finger. For the ring finger keep the tape straight (as shown in the figure). Apply white nail polish. let the polish dry and then take the tape off, otherwise you'l ruin the edges. STEP 3: Using a striper, draw straight red lines on the white polish. To make sure your lines are straight, draw a line in the middle and then proceed towards the sides.  to add more detail you might add these small triangles on top of the stripes. STEP 4: Mix some white acrylic paint to an orange acrylic paint to make ...

Manicure design

Image
hey girls, I'm back with a manicure nail art, Eid special :D The best thing about this nail art is that you can use any color you like in it, no restrictions.;) THINGS I HAVE USED: A base coat A purple nail polish (local brand) A white acrylic colour A thin brush Rhinestones A top coat STEP 1: Apply a base coat to nourish and protect your nails. STEP 2:   Use any color of your choice to do the manicure. You can use manicure tapes for neater manicure. STEP 3:(optional) Now use a very thin brush and white acrylic paint to make the design as shown. STEP 4: The fourth step is to add rhinestones to your nails. Put a drop of top coat or nail glue on your nail and then stick the rhinestone to it. Let the polish or glue dry. STEP 5: Apply a top coat to your nails. your elegant and easy manicure design is ready ;) See you girls next time...

Coffee nail art

Image
Hey girls ;) Are you going out for a coffee? What do you think about wearing the coffee nails?? :D Here's a tutorial of my coffee nails :) I've tried my best to explain the tiniest bits but still if you have any queries, feel free to ask, I'll definitely try to answer in the best possible way :) so lets start :D THINGS I HAVE USED: I have used the colour studio professional nail polishes. 1. mocha 2. deep under cover 3. eve's secret 4. the super base coat 5. the super top coat I've also used acrylics to make the coffee colour...since my coffee coloured nail polish just got finished :(. But acrylics are always a great help. You can make any colour you want with the combinations of basic colours. I've used: 1. red acrylic colour 2. blue acrylic colour 3. yellow acrylic colour The dotting tool is an old mechanical pencil. I use it for making smaller dots. For larger dots you can use the back of your make-up brushes ...