Posts

Showing posts with the label easy nail art

Pink and yellow??

Image
Hey girls :) I uploaded this manicure on my Facebook page a long time ago, I wore it again yesterday to a relative's place and thought of uploading the pictures for you guys :) Hope you like it <3 Don't forget to leave your comments below and follow the site to keep updated :-)

Stamping Nail Art

Image
Hey guys..;) Here's a quick post on stamping nail art since I recently bought a stamping kit (mentioned it in my last post) and I just love it :D stamp and plates The post is going to be short because I am having my Send ups (pre-professionals) for my first year MBBS starting from Monday and I am soooo tensed :( Do pray for me) :D Stamping is the easiest and fastest way to impress people with beautiful designs on your nails. Since I didn't have time to do a tutorial on how do it, I took a post from wiki how ( http://www.wikihow.com/Use-a-Nail-Stamper ). Here are a few of my stamping creations. For the above nail art I have used morocco by color studio professionals and luscious black nail polish. The stamping plate that I have used is m89. Stamping plate m89, I have stamped the lower right one. Without top coat. This is another try on stamping ;) Here I have used toronto (purple) by Color Studio professionals as the base color and eve's se...

Color rain :D

Image
Hey guys :D It's raining in my area and I love rains. After all the heat and the scorching sun, the rain feels like blessing <3 Along with the great weather I just bought some great nail art accessories (on which I'l be doing a post later) and a dotting tool at-last :D (I've been wanting to buy it since I first started nail art :P) So with all the raining and the dotting tool, this design popped into my mind. Its very simple, looks amazing and plus it's the half moon manicure. :D I have used the Luscious black nail polish as the base and for the color rain I have used the following nail polishes: color studio professionals haute wheels(orange) color studio professionals baby blue color studio professionals Toronto(purple) color studio professionals pretty in pink sweet touch antique gold For the half moon manicure, I used the normal nail manicure guides, pasted them on the base of my nail and then painted the nails black. To finis...

green and black??

Image
Hey guys :) I'm not here with a tutorial this time but rather pictures of my new nail art :) Tutorials take allot of time and due to my busy schedule (medical studies) its really hard to do tutorials every week and its becoming the reason for my large post gaps. Therefore, I thought to reduce some workload and focus less on tutorials and more on designs :) This nail art is very easy and you guys can easily do it without a tutorial also :) if you guys still want a tutorial you can leave a comment below and I'l try my best to do it :) Here, I have used the black nail poish from Luscious, a green acrylic color, a thin brush and some silver glitter nail polish. This design just popped into my mind when i bought my first neon nail color. It's a neon green but the color can't be used in this design because its very hard to make designs with nail polishes and plus they ruin the brushes also. So,I ended up using my acrylic color and the results turned out to be gre...

TUTORIAL: Nail art with nail art pens

Image
Hey guys, Here is a new nail art :D My sister gifted me a nail art pen a couple of days back, and i was thinking of doing something creative with it. This is what I came up with. THINGS YOU NEED: A maroon nail color A golden nail art pen A base coat A top coat HOW TO DO IT: Apply a base coat to protect your nails and let it dry. Now apply the maroon nail color on your nails and let it dry. Next take the nail art pen and start making the design on your nails as shown in the picture below. It is better to practice on a paper before you do it on your nail. Apply a top coat. Your easy nail art is ready :D I hope you guys like the nail art and find it easy. For any queries you can contact me on my facebook page or post your problems in the comments below. See you guys next time.

Sun Nail Art

Image
Hey guys...:)  Here I am keeping my promise :) I know the weather is so hot outside, the heat is killer :( and it makes me hate summers :( So I thought what to do to make everyone feel better about the sun and I came up with this sun nail art :D THINGS YOU NEED: a base coat a white nail polish  a blue nail polish a white acrylic paint a yellow acrylic paint a red acrylic paint a silver nail polish or acrylic paint a top coat. Let’s get started J 1.      Put a base coat to protect your nails from discoloration. 2.      Paint 4 of your nails a blue color and any one nail a white color for the sun. I chose my middle finger because the nail is a little wide and provides more space to work on. 3.      Now take a flat brush and take a yellow acrylic color on ¾ of the brush and red acrylic color on its tip as shown in the picture. 4.      Next use the bru...

Strawberry nail art

Image
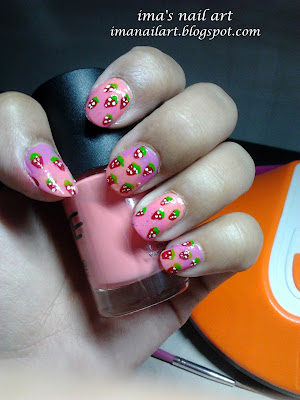
Hey guys..It feels great to come back after so long. I am so so sorry for disappearing, this year has been so busy. I got into medical school, shifted to a hostel, new place, studies, its been really hard and busy. But since I am back, i'l try my best not to disappear again. Here's a new nail art tutorial for summer Its easy and simple and looks great :D STRAWBERRY NAIL ART THINGS YOU NEED: peach color nail polish red color nail polish white color nail polish green color nail polish a dotting tool  a brush  a top coat a base coat HOW TO DO IT 1. Start off with a base coat 2. Let it dry then put the peach nail color as the base for the nail art 3. Take a brush and make small red triangles 4. Now take a dotting tool and make small white dots on the red triangles. 5. Next take a green nail polish and make leaves on top of the triangles. 6. Apply the top coat and your strawberries are ready Hope you like the nail art :D I'l be bri...

Tutorial: STRIPE NAIL ART

Image
Hey girls :)) here i am with a stripe nail art tutorial. Straight lines have always been a problem for many of us so, i thought to find out an easier way to make neat stripes and ended up with this ;) The interesting thing is that this stripe nail art does not need a stripper brush ;) you want to see how? lets do it then ;) THINGS YOU NEED: a tape scissors silver nail color or chrome nail color (or any shiny nail color) black nail color top coat base coat   HOW TO DO IT: STEP 1: Apply a base coat to protect your nails. STEP 2: Now apply the silver polish or chrome or any color and let it dry completely. This base color is going to be the color of your stripes. STEP 3: Now cut very thin stripes of tape and when your base color is completely dry paste the stripes to your nails, the way it is shown in the picture. STEP 4: Apply black nail color on your nails. (do not remove the tape now) let the polish dry completely. You might hav...

Tutorial: Breaking dawn nails

Image
hey girls..I'm back with the hot breaking dawn nails..:D All of us have been impatiently waiting for breaking dawn to realease, and here we are, it's about be released girls :D and I'm sure you guys will love to wear the breaking dawn nails while watching the most anticipated part of the saga :D So lets not waste time and start :D THINGS I USED: a black polish a white polish or white acrylic paint would make it rather easier to make the piece. a matte top coat a thin brush. a grey polish a top coat a base coat. TUTORIAL: STEP 1: Apply a base coat to protect your nails. STEP 2: Apply a black nail colour to your nails. STEP 3: Now, we have to make the piece. For this you need a very thin brush and a white acrylic colour or nail polish. Now start making it as shown in the picture tutorial below. It's very easy, trust me, i made it in the first go ;) STEP 3: Now make the checkerboard design. It's absolutely up to you if you want ...